Keycloak OAuth for Spring Cloud Data Flow
Author: Nicholas M. Hughes

I wrestled with this for far longer than I’d care to admit. The Spring Cloud Data Flow documentation only has examples for UAA (User Account and Authentication) Server, so porting that to Keycloak based on that information alone is a nightmare. After digging through GitHub issues, I found a link to a GitHub repository which did a pretty good job of laying out the main pieces of the configuration.
Unfortunately for me… there was a critical piece missing. (More on that later )
…but luckily for you, this page will (hopefully) get you pointed in the right direction!
Keycloak Client Configuration
This part is tricky. I’m using Spring Cloud Data Flow version 2.7.1, and it wants to use scopes for accessing different roles within the application most of my other experiences have been with using Keycloak groups directly in the token, so this part broke my brain a little bit.
First, we’ll set up most of the client.
1. Create a new client. I’ve named mine scdf-test.

2. On the “Settings” tab, change the following settings to match the included screenshot.
Settings:
Access Type =
confidentialService Accounts Enabled =
ONRoot URL =
https://scdf-test.example.local/Valid Redirect URIs =
https://scdf-test.example.local/*

3. Click the “Save” button at the bottom of the screen. This will enable some additional tabs at the top of the screen.
4. Go to the “Credentials” tab and grab the UUID out of the Secret box. Hold on to it. You’ll need it in the next section when we configure SCDF.

5. Mappers can help you to get some good info into your tokens. SCDF wants to know your username, and there’s a section of the configuration (shown later) where you can set the token key where it’s found. In my example, I’m mapping the user property I care about to the username key. You might want to modify this step for your environment.

6. Go to the “Roles” tab and create any roles you’d like to dole out. I only had administrators and viewers in my environment, and viewers seemed to be treated as the default in my setup… so, I just created an ADMIN role.

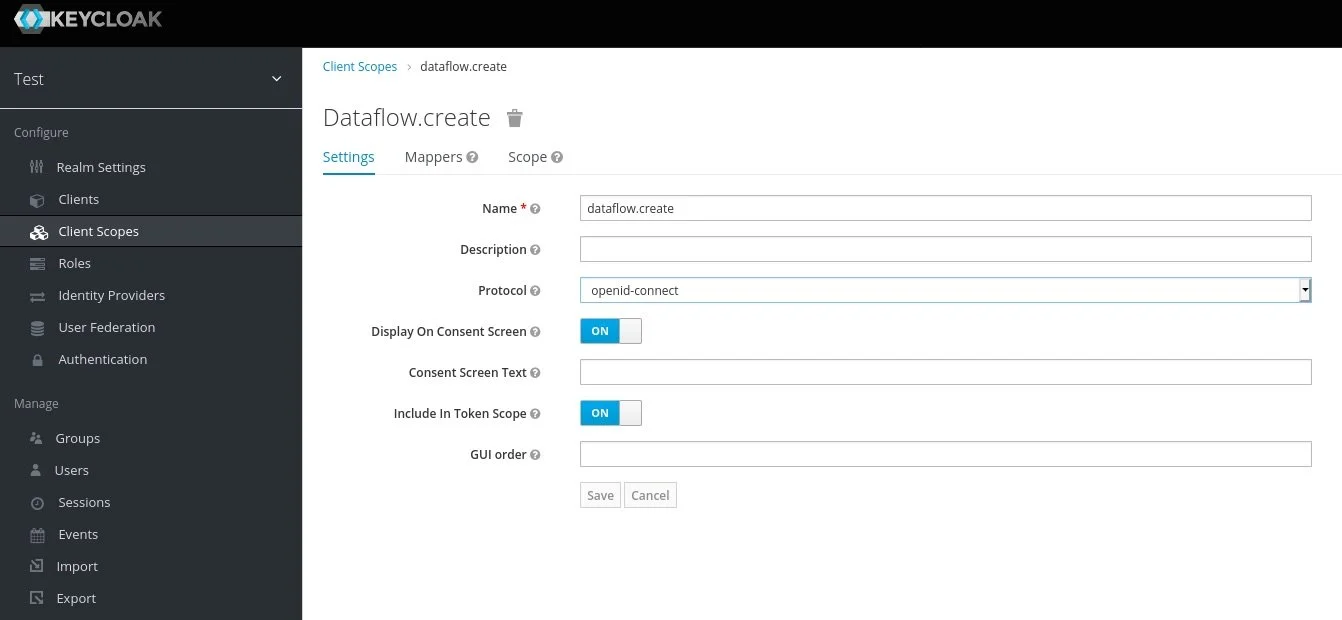
7. Now that we have an ADMIN role, we’re going to create the scopes that the Keycloak role will utilize. Note that we also discuss roles in the context of SCDF for the application configuration… this is a different role… like a rollup role… a role-up, if you will. Select the “Scopes” section on the left side of the screen.
8. For each of the following scope names, create the scope, save it, and then go back in to assign the client role to the scope. This will assign all created scopes to the ADMIN role for the client and was the critical piece I was missing. If you created other roles, assign the roles to whichever scopes you’d like that role to have.
Scopes:
dataflow.createdataflow.deploydataflow.destroydataflow.managedataflow.modifydataflow.scheduledataflow.view

9. Now we’re going to add our newly created scopes to the client. Go back into the client we created and access the “Client Scopes” tab. Assign our scopes as Default Client Scopes.

10. Finally, we want to assign our client role to users. We can do this by assigning the role to users directly or through Keycloak groups. I’d advise the latter. To add a client role to a Keycloak groups, create or edit a group and then go to the “Role Mappings” tab. You can select our client and the role you’d like to assign to the group. Then add as many folks as you want to the group to assign permissions in SCDF!

Spring Cloud Data Flow Configuration
This part is “easy” once you know the correct configuration sections. The aformentioned GitHub repository example was really helpful for this. I’ve included an example ConfigMap below as well. If you’re using Spring Cloud Data Flow on Kubernetes, you can tweak this ConfigMap for your environment and then reference the existing ConfigMap name in your deployment for use by the application. This assumes that you’re running Spring Cloud Data Flow in Kubernetes and deployed with a mechanism such as this Bitnami chart.
Note that I have variable references to sensitive information in the configuration. Those variables are sourced from Kubernetes Secrets. Check out the Helm chart documentation for information on how to provide those Secrets.
Apart from the OAuth client secret and database password, the main changes in the configuration below will be to the Keycloak URLs. The hostname will obviously change for your environment and we created the client in a realm called “test”, so those two items will change in the URLs for your configuration.
---
apiVersion: v1
kind: ConfigMap
metadata:
  labels:
    app.kubernetes.io/component: server
    app.kubernetes.io/instance: test-spring-cloud-dataflow
    app.kubernetes.io/name: spring-cloud-dataflow
  name: test-spring-cloud-dataflow-server
  namespace: spring-cloud-dataflow
data:
  application.yaml: |-
    spring:
      cloud:
        dataflow:
          security:
            authorization:
              provider-role-mappings:
                keycloak:
                  map-oauth-scopes: true
                  role-mappings:
                    ROLE_CREATE: dataflow.create
                    ROLE_DEPLOY: dataflow.deploy
                    ROLE_DESTROY: dataflow.destroy
                    ROLE_MANAGE: dataflow.manage
                    ROLE_MODIFY: dataflow.modify
                    ROLE_SCHEDULE: dataflow.schedule
                    ROLE_VIEW: dataflow.view
          task:
            platform:
              kubernetes:
                accounts:
                  default:
                    limits:
                      cpu: 500m
                      memory: 1024Mi
                    readinessProbeDelay: 120
                    livenessProbeDelay: 90
                    podSecurityContext:
                      runAsUser: 1001
      jpa:
        properties:
          hibernate:
            dialect: org.hibernate.dialect.MariaDB102Dialect
      datasource:
        url: 'jdbc:mariadb://test-spring-cloud-data-mariadb:3306/dataflow?useMysqlMetadata=true'
        driverClassName: org.mariadb.jdbc.Driver
        username: dataflow
        password: ${mariadb-password}
        testOnBorrow: true
        validationQuery: "SELECT 1"
      security:
        oauth2:
          client:
            registration:
              keycloak:
                redirect-uri: '{baseUrl}/login/oauth2/code/{registrationId}'
                authorization-grant-type: authorization_code
                client-id: scdf-test
                client-secret: ${SECURITY_OAUTH2_CLIENT_CLIENTSECRET}
                scope:
                  - email
                  - groups
                  - offline_access
                  - profile
                  - roles
                  - dataflow.create
                  - dataflow.deploy
                  - dataflow.destroy
                  - dataflow.manage
                  - dataflow.modify
                  - dataflow.schedule
                  - dataflow.view
            provider:
              keycloak:
                user-name-attribute: username
                jwk-set-uri: "https://keycloak.example.local/auth/realms/test/protocol/openid-connect/certs"
                token-uri: "https://keycloak.example.local/auth/realms/test/protocol/openid-connect/token"
                user-info-uri: "https://keycloak.example.local/auth/realms/test/protocol/openid-connect/userinfo"
                authorization-uri: "https://keycloak.example.local/auth/realms/test/protocol/openid-connect/auth"
          resourceserver:
            opaquetoken:
              introspection-uri: "https://keycloak.example.local/auth/realms/test/protocol/openid-connect/token/introspect"
              client-id: scdf-test
              client-secret: ${SECURITY_OAUTH2_CLIENT_CLIENTSECRET}
          authorization:
            check-token-access: isAuthenticated()
Wrap It Up
And Robert is your father’s brother… you’re done! I hope this helped to clear up some of the more frustrating parts of this journey. Feel free to reach out to me on LinkedIn if you have any comments or questions.
Nicholas Hughes helps businesses integrate cloud and cybersecurity automation into their IT lifecycle processes in order to amplify the efforts of the existing workforce, prevent employee burnout, and free them to do the more important tasks that might be currently neglected. As part of his daily duties as a founding partner and CEO of EITR Technologies LLC., he’s responsible for all of those super awesome elements of the CEO job that you read about as a kid, like setting the strategic direction of the company and modeling corporate values. Additionally, Nick still performs technical consulting work with specializations in Automation & Orchestration, Cloud Infrastructure, Cloud Security, and Systems Architecture. He has over 15 years of experience in a wide breadth of roles within Information Technology, which is invaluable to clients seeking comprehensive technical solutions to business problems. Nick highly values pragmatism, logical thinking, and integrity in both his business and personal life… which is a decidedly boring set of core values that reap great results when applied to the task at hand. He also has a wonderful wife and two boys who keep him on his toes.